Announcing A New Kind Of Event For The UK

I’m very happy to announce that, together with our friends at LDC we are putting together a technical networking event in London this March. This is something new and different and we hope people will come to exchange ideas across a broad range of topics, share what they are working on and learn from others.

Collaboration Stack Community Event
Do you work with collaboration platforms? Meet your peers at an informal, technical get-together. Whilst making valuable new contacts, you can share ideas, debate best practice and explore emerging technologies.

We hope to have interactive talks on broad topics such as security, development languages, and single identity including round table discussions where we can brainstorm ideas.

The date of March 21st is set and it will be in central London. It will also be free.

This is a community event, we will not be having a sponsor area , but if you or your company want to get involved please contact anyone from Turtle or LDC. We will be looking for topic ideas and round table moderators as well as session leaders.

Watch our site http://cscevent.com for more news and registration details.

A word of warning about Sametime 9 Community Server

Someone on our Sametime exam team questioned this this morning and I realised it definitely needs to be publicly called out. The Sametime 9 Community Server no longer has any stpolicy.nsf database or a policies view under the old school web based admin. If you upgrade to Sametime 9 you must install the system console (and db2) to be able to manage and maintain policies going forward.

Something for your planning…

Sametime Pt 3: Installing Communicate

As I said when Sametime 9 shipped, I wanted to spend a few weeks working with it and trying to install it and migrate my existing sites before I blogged.  I’m coming near the end of that now and so wanted to share a few things.  This first blog is about Sametime Communicate which includes Domino , Sametime Community Server, DB2, LDAP, Sametime System Console and Sametime Proxy.  It also includes installing the Sametime Advanced server for Persistent Chat and Broadcast Tools but I want to talk about that separately.

Whether you have installed Sametime 8.5x with WebSphere components or not, Sametime 9 and its install is a very different proposition.  I’m going to start by saying that I would never attempt to upgrade an existing install of WebSphere elements.  IBM in fact say that you should do a side by side upgrade and then move the existing databases for the System Console, Meetings, Advanced and ST Proxy (possibly) over.  That basically involves building an entirely new environment and then switching DNS when you’re ready so your users point there.

It’s my nature to be risk averse and in my testing migrating the existing System Console database is a nightmare. The version of DB2 you should use for Sametime 9 is 10.1, so that means that you’d have to upgrade the database as you migrate. In addition, the schema for the Sametime 9 system console database is not the same as for Sametime 8.5x and, though you can theoretically fix that using the scripts IBM supply, I would rather start completely clean.  The only databases I would make an effort to migrate over are the Meetings and Sametime Advanced because they contain data you can’t lose.  Even so there are no good instructions in the documentation for migrating a Sametime 8.5x Meetings database on DB2 9.7  to a Sametime 9 Meetings database on DB2 10.1 – I would contact IBM support in advance and ask for a tech note with instructions because the documentation has some large gaps there.

Of course, if you don’t have Meetings or ST Advanced right now then you can go ahead and create shiny new databases for your new install.

Download: The first step is to download all the software and get it in place.  Sametime 9 uses WebSphere 8.5 which installs differently than with previous versions of Sametime.  It’s actually a much nicer and easier to manage install, but you will need to install WebSphere by itself before you can install any of the Sametime components.  Make sure you download the version of WebSphere and Installation Manager that is part of the Sametime eAssembly or verify very carefully with the system requirements that you are installing the right version.  Sametime 9 uses WebSphere 8.5 (no fix packs) with additional Sametime specific iFixes, all of which can be downloaded together.

DB2: The version of DB2 supported for Sametime 9 is now 10.1 which is very different in UI from DB2 9.7. For starters, there is no longer a Command Center with a graphical interface allowing you to see and manage databases.  You have to install a separate DB2 client if you want to access the DB2 server and look at the databases. You can install that client on any machine that can access the DB2 server.

WebSphere:  One of the main reasons an in-place upgrade can’t be done is that the underlying version of WebSphere has changed and can’t be upgraded for Sametime.   We have to install WebSphere cleanly.  When installing WebSphere 8.5 you’ll notice the download comes in three parts.  You’ll need to extract all three parts to the same directory which will then contain folders disk 1, disk2 and disk 3 and a file called repository.config in the root folder.  When you install Installation Manager you can then use it to install WebSphere and every other product (other than Domino and the Community Server). You launch Installation Manager and point to the folder where you put your extracted files, it will do the rest.  It sounds complicated but it’s actually very simple and has a huge advantage in that it’s able to search the IBM site for fixes and updates rather than download them each time.

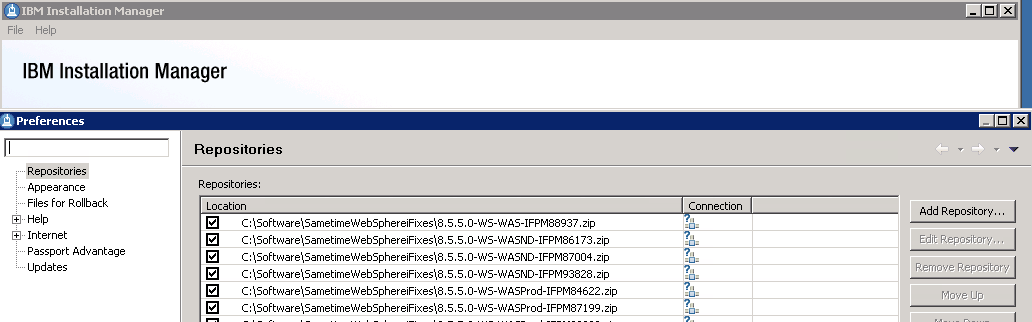
Launch Installation Manager – Choose File – Preferences from the menu and set up your repositories as I have done below (these point to the fixes which were zip files, these didn’t need to be extracted but I wanted them listed separately so I could check them)

Installation Manager - Adding Repositories

Community Server: When installing the Community Server, IBM have added some much needed additional steps to the documentation providing details on performance tuning Windows 2008 and 2012 networking and securing the server to protect against vulnerabilities discovered in the past few years.  None of this is new, it was all public information in technotes but it’s good to see it brought together in the documentation as part of the deployment instructions.  Don’t be tempted to skip over these steps and come back later, they will double the amount of time it takes to install a Community server (from about a day to about a day and a half) but they are important.

If you are moving from an earlier version of Sametime you will need to be using LDAP if you aren’t already and you can’t use your Sametime Community Server as its own LDAP server, that’s not supported and will  present problems.  In fact you should disable LDAP on the Domino server running Sametime completely.

Sametime Proxy Server: The Sametime Proxy server is used for mobile clients, for awareness in web based meetings, for a browser based IM client and more.  You need to install this as a WebSphere component.  It is IBM’s recommendation that each component have its own VM but I have had success in the past co-locating multiple server elements depending on number of users.  There are a few more  settings some of which were available in Sametime 8.5x but again in technotes, etc and so weren’t well known.  Once a Sametime Proxy Server is installed there are several steps to finish the install, as with the Community server, that will improve performance and security. One interesting item that everyone now will probably come across is that the Sametime Advanced server must use the same SSL certificate as the Sametime Proxy server for awareness to work, making wildcard certificates more suitable to our installs.  Previously I had avoided wildcard certs since WebSphere had issues with them in earlier releases but that appears to be resolved now.

Additional steps on completing the install of Sametime Proxy include making sure you connect to the notification servers for both Apple and Google to ensure mobile devices running iOS and Android can receive updates.  There are also settings to tell the Sametime Proxy server to not connect to the user’s home Community server allowing you to explicitly direct traffic to a dedicated Community member instead.  Instructions for that here.

Finally we usually have a WebSphere Proxy server in front of our Sametime Proxy to handle traffic over port 443.  In the Sametime 9 documentation IBM now seem happy to recommend a reverse proxy for accessing  the Sametime Proxy (I have customer doing that and using products like Netscaler) and only using a WebSphere Proxy in front of a cluster of servers.  The WebSphere Proxy is an intelligent authenticating server that will validate the user prior to directing traffic to a Sametime Proxy server.  If you have multiple Sametime Proxy servers in a cluster, the WebSphere Proxy may redirect the traffic to any of them.  Performance tuning for the WebSphere proxy has been nicely consolidated here.

This was meant to be a short blog entry, obviously I haven’t covered everything but hopefully I have given you some pointers.  More to follow…

Domino LDAP Insufficient Access

Here’s where you all get to laugh and point at me for not knowing this sooner.  I was setting up Domino for LDAP access on a server with multiple directories in DA.  Everything was working fine until I wanted to write values from another source into the Domino LDAP.  Insufficient access.  OK so let’s check

  1. Account being use to authenticate has Editor access to the ACL in all directories in Directory Assistance
  2. Global Configuration document in Domino is set to allow LDAP write activity
  3. Global Configuration document in Domino is set to allow write activity that doesn’t conform to the schema
  4. I can login to the web interface of Domino using the LDAP credentials and successfully edit the person document I’m trying to change through LDAP

So what was my problem?  Apparently with LDAP write activity the Global Configuration document enabling LDAP to do writes has to appear in every directory used by Directory Assistance !  I finally got there by trial and error but that makes no sense at all, especially because the secondary directory doesn’t even need to use the pubnames.ntf template.  The Global Configuration document by definition controls LDAP activity for the entire domain which surely includes any secondary directories that are set up.  But that’s what it was.

I created a Global Configuration document in my secondary directory and set it to allow LDAP and write activity and my “Insufficient Access” went away.

Ooh look – wordpress has a poll facility , let’s try it.

Adventures in TDI – Connections and Updating Profiles

Recently (well the past couple of months) I have been working on building custom Assemblylines to sync Connections data held in DB2 to LDAP data held in Domino.  I really struggled with finding good documentation for doing this and that’s because the best documentation was written for 3.0.1 and hasn’t been updated since.  Thanks to help from some people at IBM (who I’d name publicly here but I’m not sure they want emails from everyone) I managed to get hold of some draft updated documentation and get answers to some questions as I went along so I thought it would be helpful to share what I’ve learnt although this is a very streamlined description, hopefully it will give you some pointers.

Firstly if you are using Connections you need to populate profiles.  Populating profiles requires you to have installed TDI (and the right fixpack, don’t try it without) but once you have done that you have 3 techniques for population, two of which involve you never seeing a TDI configuration screen.

1. The population wizard which is a graphical tool supplied by IBM for pulling data from LDAP into your Connections data source (DB2 in this case).  The population wizard is easy to use and meets that needs of I’d say 60%+ of users who are working with Connections.  It’s certainly where most people begin to get that information populated in the first instance.

2. Underlying the population wizard are XML and properties files.  If you run the wizard you’ll find it has written to  properties and XML files on the file system and then it uses IBM supplied scripts to run the import.   What you can do is take a copy of the TDISOL directory which contains all the properties, xml files and scripts (and is updated on Fix Central occasionally) and use those to create you own custom syncing.  The files you will be working with are

tdienv.bat/sh  This is where you tell TDI to find its own installed files

profiles_tdi.properties  This is where you tell TDI how to find the LDAP and DB2 sources as well as how to authenticate with them

map_dbrepos_from_source.properties This is where you tell TDI how and what to map from LDAP (Domino) to Connections (DB2)

map_dbrepos_to_source.properties  This is where you tell TDI how and what to map from DB2 to LDAP if required.

You can then schedule a batch file called sync_all_dns.bat /sh which will bi-directionally update the information according to those files.  I would always recommend a) doing this in a test environment first b) backing up PEOPLEDB before starting c) running collect_dns.bat/sh first to ensure your search scope for LDAP returns the users you expect

3. So if you’re still with me and you want something even more advanced you’ll need to create an Assemblyline using the TDI Configuration Editor. For instance sync_all_dns does a complete bi-directional sync so for 50k users it was taking nearly an hour and for 25k users 20 minutes because it has to check every record in both LDAP and DB2.  That was taking too long so we wanted something that ran faster, in another case we wanted to pull in data from another data source to populate profiles alongside the LDAP data.  Using TDI and creating a custom assemblyline allows you unlimited scope to pull data from any LDAP or JDBC source (amongst others) into your profiles.

You’ll hear a lot of talk about Assemblylines being “real time” but in fact that’s very difficult to do in a Connections environment.  There is no real time monitor of generic LDAP you can use.  There are change control monitors for both Domino and Active Directory if you are using those as your LDAP source you can use them to  continuously monitor the servers and trigger on any change.  I have found however there is a risk associated with a continuously running and monitoring service and, being risk averise,  I prefer to schedule my Assemblylines to run.     There is also a change connector for RDBMS you could use to monitor DB2 but again, I prefer to use the standard Connector with a SQL statement telling it to look for things modified in the past x minutes or whatever.  I then export the project  and create a batch file to call the Assemblylines I want, scheduling that to run repeatedly in Task Scheduler (for Windows) or Linux.

The hard and fast rule when creating an Assemblyline is that you must use IBM’s supplied files.  They have provided Assemblylines that can be copied and modified to do just about anything you need.  To begin with you will need to complete the tdienv.bat/sh and profiles_tdi.properties files which will be used by the Configuration Editor when it’s launched.  Once launched you’re going to create a new project by importing the profiles_tdi.xml file and that will present you with all the Connectors and starter Assemblylines you need.  In particular there is a Connector called the ProfilesConnector which contains everything needed to write to a profile.

Without going into 40 pages more detail, I hope this helped.  This paper from IBM is the absolute best source for setting up your environment, although significantly out of date it will set you on the right path .  I am also anonymising a simple Domino – DB2 and DB2 – Domino Assemblyline  that I am happy to share with people once it’s complete.  I can’t support it and you take it at your own risk but it may help you to see something configured.