Deploying The AppDev Pack – An Admins Guide

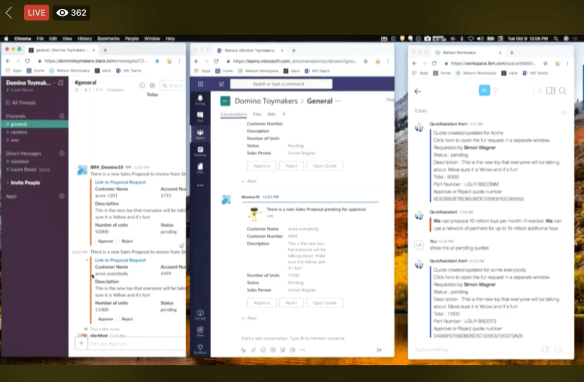
Over here on the blog is Tim’s next entry talking about Node development and Domino, this time he explains how to use the early release of the app dev package to access (read and write) Domino data via Node.  However I don’t let developers do Domino admin so this is the bit where I explain how to configure Domino.  It’s all very easy and also all still early release so things may well change for GA.

First you will need to request the early release package which you can do here. What you’ll then get is a series of .tgz files including one entitled ‘domino-appdev-docs-site.tgz’ which, once extracted, gives you the index.html with instructions for installing.

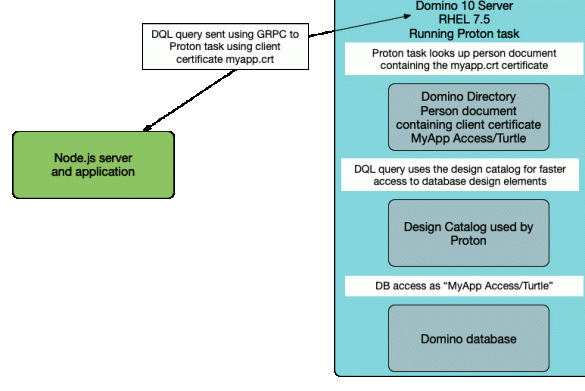
You need to bear in mind that at least initially this only runs on Linux and Domino 10 and that Domino 10 on Linux 64bit officially means RHEL 7.4 or higher, or SLES 12. I went with RHEL 7.5.

Next we need to install  “Proton” so it can be run as a Domino server task which just means extracting the file ‘proton-addin.tgz’ into the /opt/ibm/domino/notes/latest/linux directory.   There is also some checking to make sure files are present and setting permissions but I don’t want to repeat the install instructions here as I would rather you refer to the latest official version of those.  Suffice it to say this is a 5 minute job at most.

Once the files are in place you can start and stop Proton as you would any other Domino task by doing “load Proton”, “tell Proton quit”, etc.

Then there are a few notes.ini settings you can choose to set including:

PROTON_SSL
= if you want the traffic between the Proton task and Node server to be encrypted (0/1).

PROTON_LISTEN_PORT= what port you want Proton to listen and be accessed by Node on (default 3002 ).

PROTON_LISTEN_ADDRESS= if you want Proton to listen on a specific address on your Domino server such as 127.0.0.1 which would require Node to be installed locally or 0.0.0.0 which will listen on any available address.

PROTON_AUTHENTICATION= how Proton handles authentication.  There are currently two options, client_cert or anonymous.  With authentication set to anonymous all requests that come from the Node application are done as an “anonymous” Domino user and your Domino application must allow Anonymous rights in the ACL.

The “client_cert” option requires the Node application to present a client certificate to the Proton task and for the Domino administrator to have already mapped that certificate to a specific person document by importing it.  Note that “client_cert” still means that all activity from that Node application will be done as a single identified user that must be in the ACL but does mean you need not allow anonymous access.  You can also use different identities in different Node applications.

Of course, what we all want is OAuth or an authentication model that allows individual user identities and this is hopefully why the product is still considered “early release”.   Both the “anonymous” and “client_cert” models are of limited use in production.

PROTON_KEYFILE
= the keyfile to use if you want PROTON to be communicating using SSL.  This isn’t releated to the Domino keyfile (although it could be) and since this is only for communication between your Node server and your Domino Proton task and never for client-facing traffic you could use entirely internally-generated keys since they only need to be shared with the Node server itself.

HCL have kindly provided scripts to generate all the certificates you need for your testing.

Finally we need to create a design catalog for Proton to use.  You can add individual databases to the design catalog and the first one you add actually creates the catalog.  There must be a catalog with at least one database in it for Proton to work at all.

The catalog contains an index of all the design elements in a Domino database so to add a new database to the catalog you would type:
load updall <database> -e

This isn’t dynamically maintained though, so if you change the design of a database you must update its entry in the catalog if you want to have new design elements added or updated, like this:
load updall <database path> -d

The purpose of the catalog is to speed up DQL’s access to the Domino data.  It’s not required that every database be catalogued but obviously doing so speeds up access and opens up things like view scanning using the <‘View or folder name’>.<Columnname> syntax.

Proton

So that’s my very quick admin guide to what I did that enabled Tim to do what he does. It’s very possible (even probable) that this entire blog will be obsolete when the GA release ships but hopefully this and Tim’s blog help you get started with the early release.

Perfect10 – Building A Test Lab

In the 10th edition of my Perfect 10 webcast I explain how and why to build a test lab so you can get to deploying those products you downloaded today. You did download them right?

I was asked recently to share the slides for all these Perfect10 presentations and to be honest I hadn’t thought of it but it’s a good idea so I’ll be sharing them all this week.

Next up: Let’s Talk Domino v10 & Admin

11 mins

All the 10s, Let’s Make Things Simple..

Announced at the Domino 10 launch today: if you have let your licensing for Domino lapse you can renew it until the end of the year saving up to 50%, and if you have licensing and need more then IBM will discount new licensing by up to 20% until the end of the year.  I don’t sell licenses but that seems like a good deal to me.  Why should you? Well, why shouldn’t you?  If you have Domino in your environment even with a lapsed license you are keeping those servers around because of all the data that’s on them – don’t you want to use that data?  Let’s talk about what you get if you are licensed:

  • access to your Domino data using Node and modern javascript development tools
  • a new query language for Domino (DQL) which allows you to access Domino data from external platforms (buh-bye ODBC!)
  • access to your Notes applications (yes even the really really old ones) on an iPad
  • entitlement to not only use instant messaging in your Notes and web clients but also on mobile devices
  • a ton of TCO features including a new 256GB db size limit, auto database repair, cluster symmetry (automatically populating entire directories from one server to another and keeping them in sync), publishing of stats to New Relic and other cloud based reporting tools, new full text indexing engine, …

I’m not mentioning a ton of other features too.  I’m giving credit to the team who did such a great job today and especially Luis Gurigay whose presentation was seamless and showed how your back-end Domino applications work with no required code changes on an iPad, how your Domino data and web apps can be integrated into O365 and (this which he showed live and I took a screenshot) of showing a Notes document being created and then published in Slack, Microsoft Teams and Watson Workspace concurrently.

The code for this will be made available via the IBM Destination Domino site tomorrow.

Screenshot 2018-10-09 at 11.05.53

So Domino 10 is out tomorrow.  The beta for the application development pack which includes the Node module is due out this week, and the beta for Notes on the iPad is due out this month.  If you want to sign up for the betas go to the destination domino site and if you want to talk licensing and you don’t have someone at IBM to talk to let me know and I’ll see who I can point you at (and then step away because I do not want to do licensing :-))

Building a stack in Node.js

[Update: Since I posted this article, I have been informed that the domino-db node integration will be available in beta with Domino10 in a week’s time!]

With Domino 10 nearly upon us, and the Node integration hopefully following soon after, I thought I would talk about building a full-stack application in Node.js, covering how modern JavaScript UI frameworks can be built on top of Node.js and integrated with Domino in the background as a datastore.

This is all part of the IBM and HCL strategy of having Node.js as a parallel development platform alongside the standard Domino development tools, with Node providing a way for web developers to extend existing Domino apps and datastores. However, you don’t have to wait for the Domino node module to start learning about this.

If you consider the development stack acronyms of DEAN and DERN (or NERD), the UI framework is the ‘A’ and the ‘R”. These initials refer to Angular and React respectively, but generally apply to any JavaScript framework, and there are many very good ones.

The main advantage of a development stack is that the UI layer can be independent of the middleware, server, and datastore layers and so you can replace or modify the UI without impacting the rest of the architecture. As an example, you might want to do this to extend an existing web app onto a mobile platform which may require a different UI.

A review of popular frameworks and their features and advantages is beyond the scope if this post, and I may return to that later, but for now I would like to get into the broader topic of how this all fits together, i.e. how does a JavaScript UI sit ‘on top of’ Node?

The first thing to understand is that UI frameworks such as Angular, React, et al, are nothing to do with Node.js. They are not part of Node.js and do not require Node.js to work. They all run perfectly happily on any web server, including Domino. When we use a UI framework with Node, Node is essentially acting as a web server, serving the framework web pages to a browser which then loads the pages and runs the framework code.

You can run framework components inside a regular Domino web form on a Domino server, but the advantage of using the JavaScript development stack is two-fold. First, the stack is all JavaScript, so it makes it easy to talk between layers because all the data is JSON. Second, we are opening up Domino to a new development arena, with an established community, support resources and third-party products.

JavaScript UI frameworks come in all sizes and flavours, but they all work essentially the same way. You embed some code in your HTML web pages and then call the framework library (usually a js file) to enable the framework within these pages. The key thing is that everything is held in the usual web files and folders which are stored on the web server file system. Your server (whether it is Domino, Node, or Apache) simply serves up these files when a browser hits it.

In my earlier post, I talked about how you can use Express to provide middleware routes in your Node server. Here is an example which uses a static route to serve up the contents of the ‘public’ folder on the server:

const express = require('express');
const app = express();
app.use(express.static(__dirname + '/public'));
const hostname = '127.0.0.1';
const port = 3000;
app.listen(port, hostname, () => {
   console.log(`Server running at http://${hostname}:${port}/`);
});

By default, the server opens the index.html file in that folder. Luckily, this is the default filename used in most UI frameworks, so it is very easy to put your framework web app and all its files and folders in the public folder and run it from your website. The folder structure could look something like this:

node
|   server.js
|   package.json
|
+---node-modules
|   \---(node stuff...)
|
+---public
|      index.html
|      other framework files...
|      +---framework folders...
|      \---etc

The Node server runs from the server.js (using modules such as Express which are installed under the node-modules folder), and serves up the framework UI starting with the index.html in the public folder.

So we have a nice UI running on our node server. Now we need to connect this UI to our data backend. In a Domino web form we would typically make a call to a web agent which would return whatever Domino data we need. Here in Node we do pretty much the same thing, specifically our UI will make a call to an API to get the data.

Node is great at two important roles – being a web server and being an API gateway. So we can add middleware routes to our Node server to handle these API calls.

Let’s suppose we want to get a list of people to display on-screen. In our UI framework we will make a call to an API on the same Node server, something like this:

let uri = myDomain + "/api/people";
request.get( uri ).then( displayTheResults );

So this request would hit our Node server with the route “/api/people”. Currently, our server doesn’t know what to do with this, so let’s add in a new Express route to handle it.

app.get('/api/people', (req, res) => {
   let myResults = doLookup();
   res.json( myResults );
})

This will catch requests coming in to “myDomain.com/api/people”, and then our middleware code does the lookup and sends the results back in the response as JSON.

Notice how these methods handle all the JSON stuff for us, making it easy to pass the data back and forth.

This is all we have to do to to get our server responding to the API call. Now we need to look at how we get data from the backend, i.e. what happens in our doLookup().

If we suppose we are going to be using the upcoming domino-db module, then we can use its methods to run queries on Domino data. The details of exactly how the domino-db module works are still under NDA right now, but it could be something like this:

function doLookup() {
const { domServer } = require('domino-db');
   domServer(serverConfig).then(
      async (server) => {
         const db = await server.useDatabase(dbConfig);
         const docs = await db.bulkReadDocuments(DQLquery);
         return docs;
   });
} 

This example function would run a Domino Query Language query on a Domino database which returns a JSON array of document objects, i.e. ‘docs’.

We pass this back as the return value of our doLookup function and this will be sent out as the response from our API route.

Back in our front-end framework UI, we receive this JSON data in our ‘request.get’ call and we can then go ahead and call our ‘displayTheResults’ function.

This really is pretty much all there is to it. We can easily get data, in a standard JSON format, all the way from the datastore to the UI front-end, without needing fiddly data manipulation and all in only a few lines of code.

Also, what is great is that the UI framework is separate from the Express routes and these are separate from the datastore. They can all be on different servers, and we can even have different UIs accessing the same API routes to get at the same data, for example separate web apps and mobile apps.

I hope this gives you an idea of how we will be able to about go about building a full-stack application in a DEAN/DERN environment. In my next blog I plan to expand on how we can use Express to build useful routes to do all sort of things, such as performing CRUD operations and incorporating business logic.

Deletion Logs – What’s Coming In V10

So deletion logs.. currently (without custom code) we cannot tell who deleted a document and what document they deleted in which database.  With v10 deletion logging is now a standard trigger on the database that creates an entry in a delete.log file in the IBM_TECHNICAL_SUPPORT directory detailing every deletion activity.

So how does it work?

Deletion logging is enabled via the compact task on an individual database basis. The option -dl is used when compacting a database along with the fields in that database you want to be part of the log. For example if I wanted to turn it on for my mail file I might do

load compact mail\gdavis.nsf -dl on subject,posteddate,sendto,recipient

Every deletion after that point would then be logged as a single CSV entry in delete.log.  Note there are standard values that are always logged in addition to the custom fields I requested

“20180210T211516,06+01″,
“Mail\gdavis.nsf”,
“80256487:00352154″, “nserver”,”CN=Traveler/O=Turtle”,
“SOFT”, “0001″,”72C0E3F8:44B53FB5DC4EDBF8:A785466D”,
“from”,”””New Relic”  –
 “<marketing@newrelic.com>”, “sendto”,”gabriella@turtle.com”, “deliveredDate”,”02/10/2018 21:05:05”, “posteddate”,”02/10/2018 16:15:18″

There are several interesting aspects to this approach but I see it being particularly powerful for audit purposes, as it shows not only the message but the timestamp of the deletion and who did it.   Note that the server name in the log entry here tells me my Traveler server did the deletion so it was done from my phone, if it had been deleted in the Notes client it would have my name there as the person who did the deletion.

The delete.log itself rolls over each time the server is restarted but obviously depending on the size of your environment and how widely you deploy deletion logging that’s a CSV file you are going to want to have a strategy for.

7 days and counting


Taking Your Pick Of Global Launch Events #Domino10

PartnerReady

The countdown is now only 10 days – on October 9th the new version of Domino and Notes v10, the first major release in several years and the first since HCL took over ownership of development has a huge launch. You can attend the launch event in person in Frankfurt (yay  Europe!) or attend via livestream.

To attend the October 9th launch event either in person or remotely register here

The next day on October 10th there are several global post launch events including many in cities across Europe hosted by IBM, HCL and partners to answer your questions in person.

I will be attending the London event at IBM South Bank which is hosted by Andrew Manby, Worldwide Director, Offering Management, IBM.  Turtle have recently become certified as a Domino 10 Partner Ready company and we’ve been working heavily with the latest beta,  I look forward to seeing and talking to you there.  You can register for the London event here

Theo Heselmans and Engage will be hosting an event in Belgium with presenters from both IBM and HCL as well as a presentation from Theo himself. Uffe Sorensen leads IBM’s Notes/Domino Messaging & Collaboration Business world wide and Barry Rosen is the Director for Products and Platforms at HCL Technologies. Register for the Belgium event here

Belsoft and Icon Switzerland will be hosting the event in Zurich with Bob Schultz (Watson Talent & Collaboration General Manager) and Richard Jefts (Vice President and General Manager Collaborative Workflow Platform) from HCL.  Register for the Swiss event here

For a full list of global events you can attend at no cost as well as the speakers in each location on October 10th see (and register) here


Adminlicious – My Favourite TCO Features in Domino 10

This is my presentation from Icon UK on Thursday 13th September.  There are lots of TCO features coming in Domino 10 that I’ve been working with and look forward to putting into production.  In this presentation I cover things like cluster symmetry, pre send mail checking, deletion logs and the newrelic statistics reporting.

Say it with me….

28 days until the Domino 10 release.